The Chevrolet Lanos is a compact car that left a notable mark in the history of the budget segment. Despite its modest specifications, it became popular in many countries due to its affordable price and simple design. Let’s look at the key stages of its production, features, and interesting details.
Years of Production and Origin
The Chevrolet Lanos is a rebranded version of the Daewoo Lanos, which first appeared in 1997. After Daewoo’s financial crisis in 2001, General Motors acquired the Korean brand’s assets, and the model continued production under the Chevrolet name.
Production of the Lanos continued in various countries until 2016, although in South Korea, it was discontinued as early as 2002. The main manufacturers were:
- Ukraine (ZAZ, 2002–2016) – for CIS and Eastern European markets.
- Russia (limited assembly production).
- Egypt (since 2005, under the Chevrolet brand).
- Vietnam (until 2013).
In some countries, such as Mexico, the model was sold as the Chevrolet Chevy.
Body Types
The Lanos was produced in three main body styles:
- Sedan (4-door) – The most common variant with a classic three-box design.
- Hatchback (3-door and 5-door) – More compact and practical, especially popular in Europe.
- Station Wagon (5-door) – A rare modification, primarily found in Eastern Europe.
Technical Specifications
The Lanos was based on the Daewoo T100 platform and equipped with gasoline engines:
- 1.4L (75–80 HP) – Base engine with an 8-valve cylinder head.
- 1.5L (86–94 HP) – A more powerful 16-valve version.
- 1.6L (84–109 HP) – Found in early versions and some export models.
Transmissions:
- 5-speed manual (main option).
- 4-speed automatic (rare, mostly for the Asian market).
Suspension: A typical setup for budget cars of that era—MacPherson struts at the front and a semi-independent torsion beam at the rear.
Bumper Plastic Marking >PP+EPDM-T10<
Note: Depending on the model year and vehicle version, mounting points may vary slightly.
How to Remove the Front Bumper
The bumper can be removed with or without the reinforcement bar.
Preparation:
- Turn the wheels left or right (depending on which side you start disassembling from).
Wheel Arch Mountings:
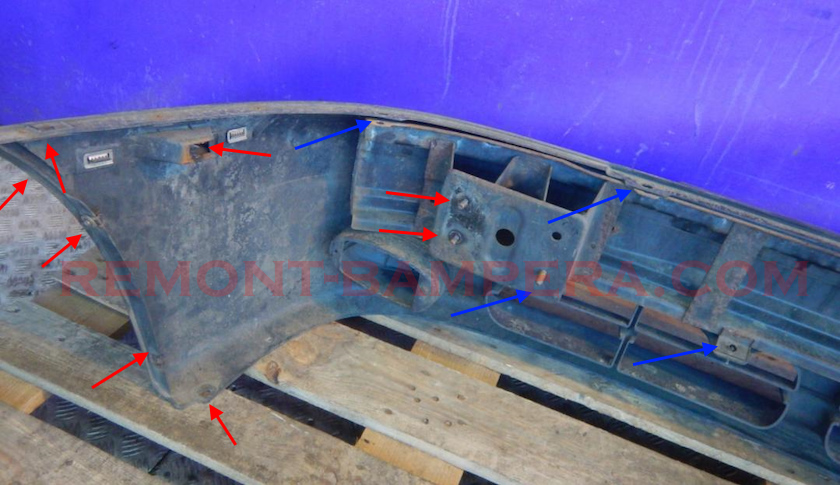
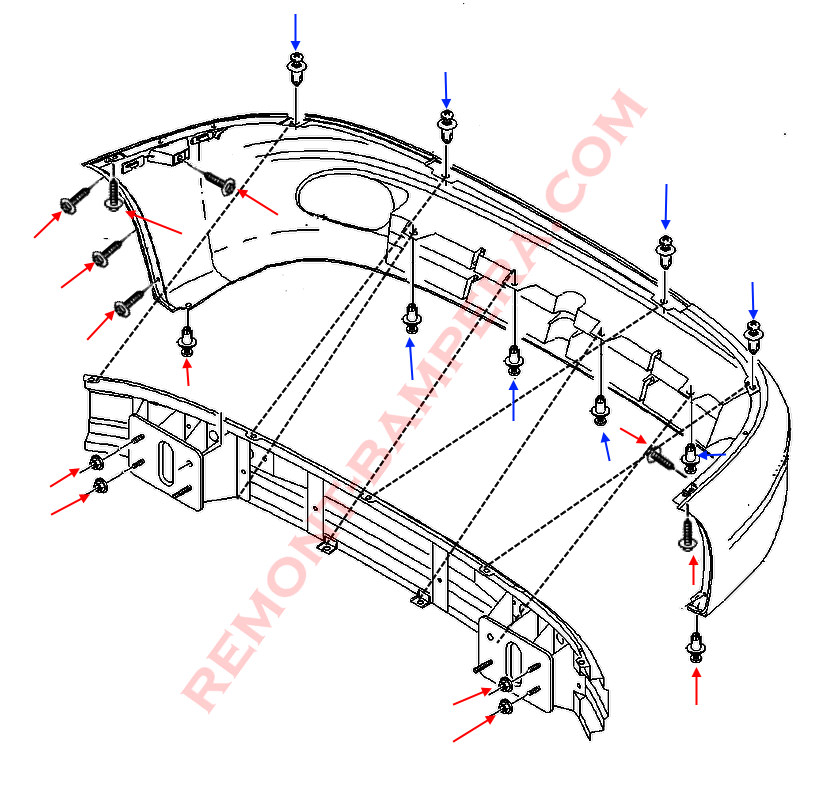
- Remove three screws and one push-pin on each side to detach the fender liners.
- Behind the liners, unscrew two screws on each side securing the bumper corners to the fenders.
Bumper Removal:
- With Reinforcement Bar:
- In the engine bay, unscrew the nuts securing the reinforcement bar to the frame rails.
- Without Reinforcement Bar:
- Remove four screws and two nuts, then detach the headlights.
- Extract four push-pins from the top and four from the bottom through the lower radiator grille (marked with blue arrows).
Removing the Bumper:
- Carefully pull the bumper forward, being mindful of wiring.
- Disconnect any electrical connectors (if present).


How to Remove the Rear Bumper
Preparation:
- Open the trunk lid.
Trunk Mountings:
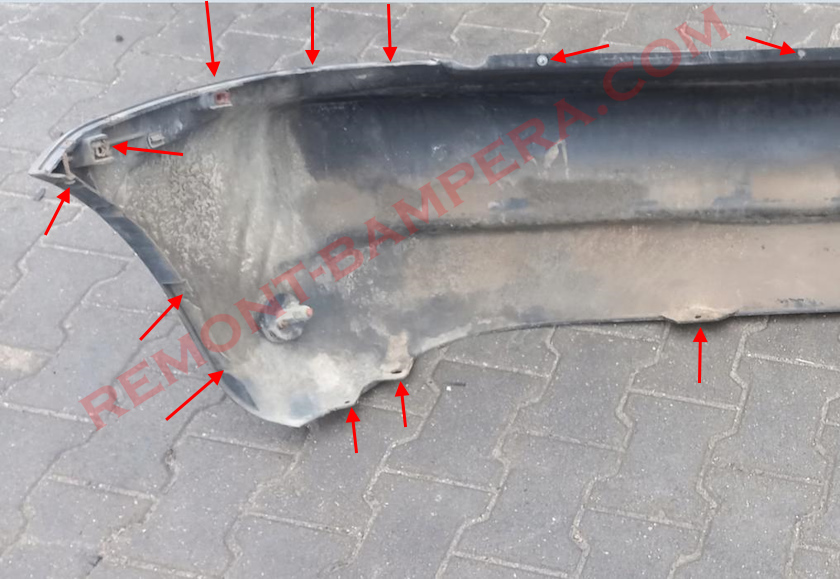
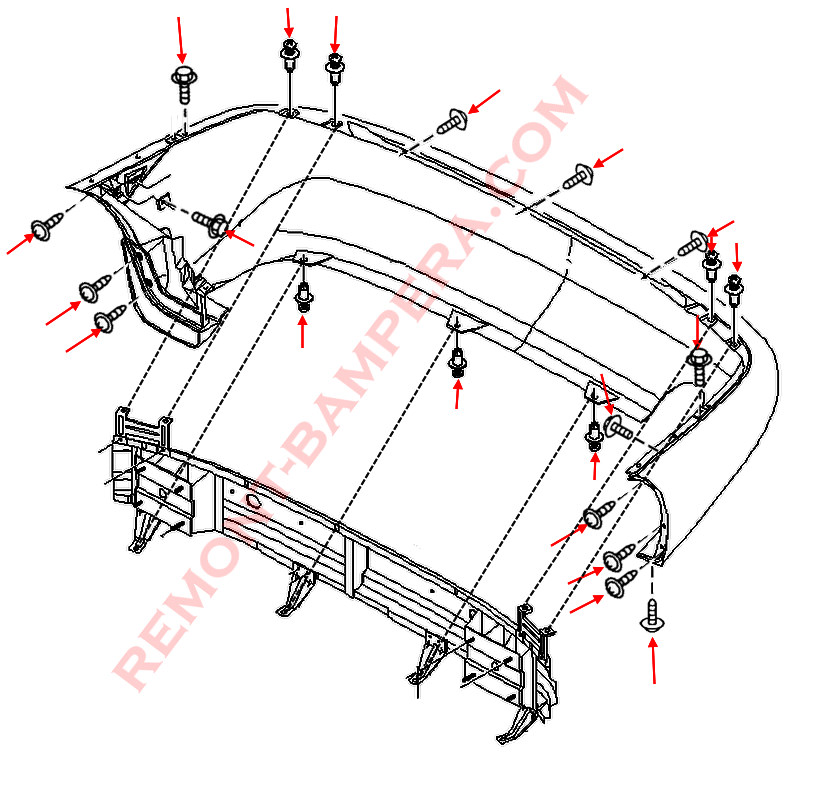
- Unscrew the bolts securing the top part of the bumper.
- Remove the trim panels after taking out the clips.
- Behind the trim, unscrew the bolts securing the bumper sides to the quarter panels (inserted top to bottom).
Trim and Fastener Removal:
- Unscrew the nuts inside the trunk and remove the covers between the bumper and taillights.
- Under the covers, remove four clips (inserted top to bottom).
- From underneath, unscrew two bolts and remove four push-pins.
Wheel Arch Mountings:
- Unscrew three screws on each side securing the fender liners to the bumper.
- Move the liners aside and unscrew one bolt on each side holding the bumper corners.
Bumper Removal:
- With an assistant, carefully pull the bumper backward to detach it from the body.


Model Features
- Design – Developed by ItalDesign under Giorgetto Giugiaro. The Lanos resembled late-1990s European compact cars but with a Korean adaptation.
- Trim Levels – Depending on the market, options included A/C, power windows, power steering, and even leather upholstery (in top trims).
- Safety – Weak by modern standards: only one airbag in the base model, scoring just 2 out of 5 stars in Euro NCAP’s 2000 crash tests.
Interesting Facts
- "The Ukrainian People’s Car" – In the CIS, the Lanos was one of the most affordable new cars for a long time, especially in ZAZ-produced versions.
- Sport Version – In 1999, Daewoo unveiled the Lanos Sport concept with a 1.6L turbo (150 HP), but it never entered mass production.
- Taxi & Government Use – Due to its low cost, the Lanos was widely used in taxi fleets and even police departments in some countries.
- Long Production Run – Despite its outdated design, it was produced in Ukraine until 2016 and in Egypt until 2018.
- Name Changes – In Mexico and Colombia, it was called the Chevy; in Romania, the Doninvest Assol; and in early-2000s Russia, the ZAZ Sens.
Pros and Cons
Advantages:
- Cheap to buy and maintain.
- Simple mechanics, easy to repair.
- Adequate power for city driving.
Disadvantages:
- Poor noise insulation.
- Low-quality interior plastics.
- Rust issues on the body.
Conclusion
The Chevrolet Lanos is a typical representative of the budget segment from the late 1990s to early 2000s. Despite its modest specs, it remained popular due to its low price and reliability. Today, this car is gradually disappearing from roads, but in CIS countries, it can still be found as a first car for beginners or a workhorse.

 English
  Italiano
  Français
  русский
  Deutsch
  Español